Understanding the Concrete Pouring Process: Step-by-Step

May 16, 2025

When it comes to building strong, long-lasting surfaces—whether it's a driveway, patio, sidewalk, or foundation—getting the concrete pouring process right is critical. At Concrete Contractor St. Johns, we believe that a well-informed client is a confident client. That’s why we’re walking you through the step-by-step concrete pouring process so you can understand what goes into a successful concrete project in St. John’s, Newfoundland.


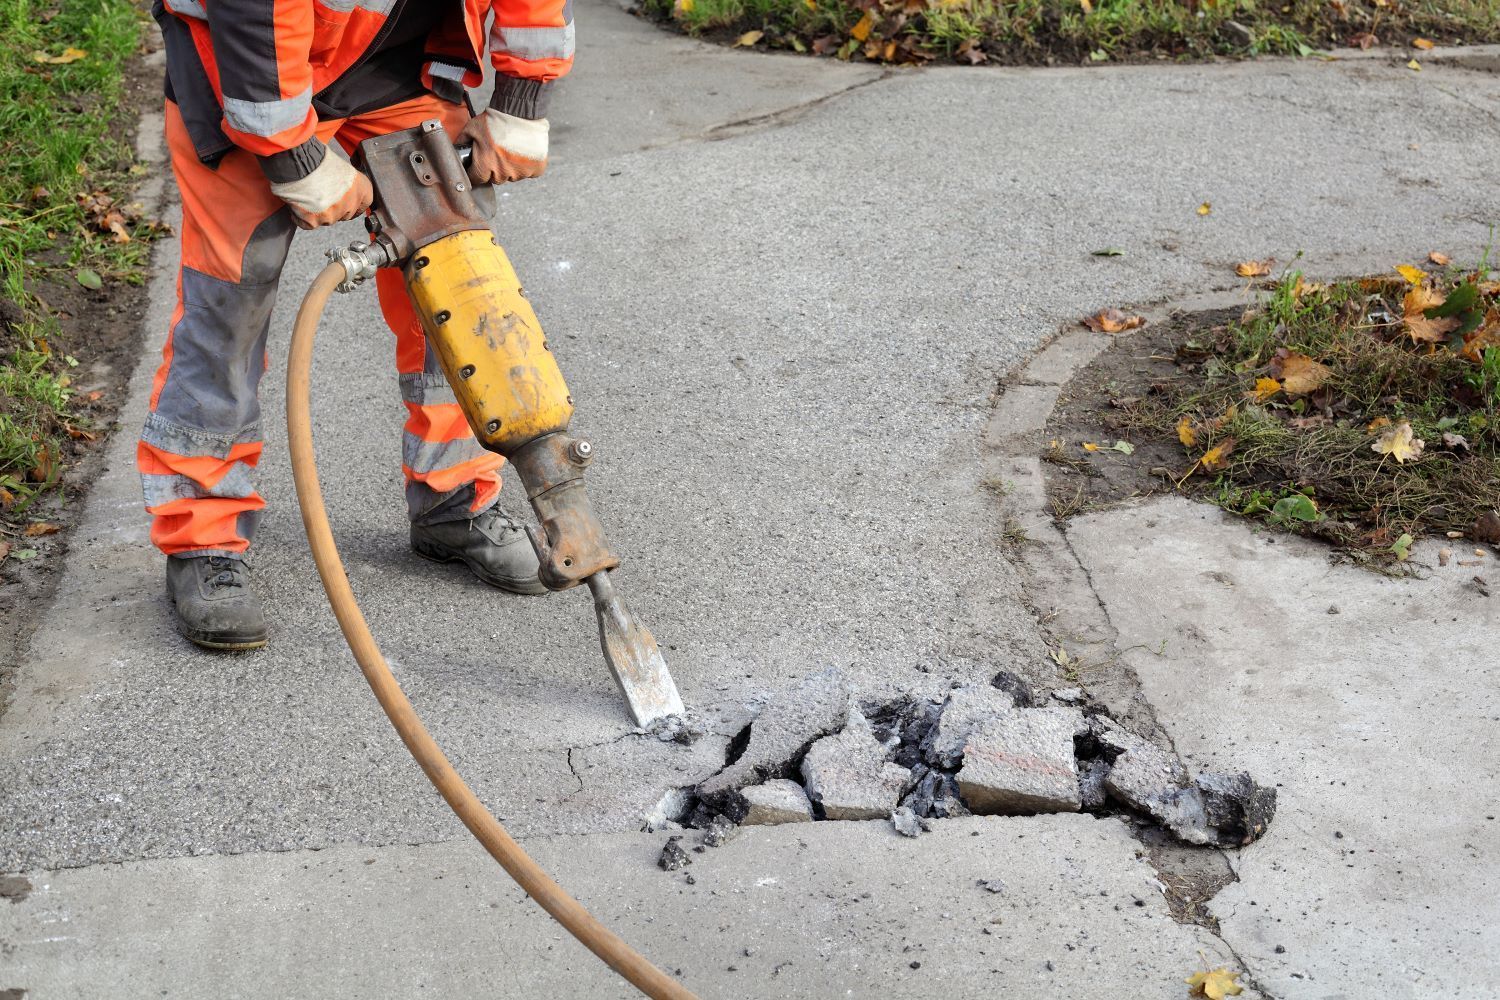
Step 1: Planning and Site Preparation

Every great concrete job starts with a detailed plan. This includes assessing the site, obtaining any necessary permits, and confirming the correct concrete mix for the project. Once the design is finalized, we:

  • Clear debris and vegetation
  • Excavate the area to the required depth
  • Set up proper drainage solutions
  • Compact the soil and add a gravel base for stability


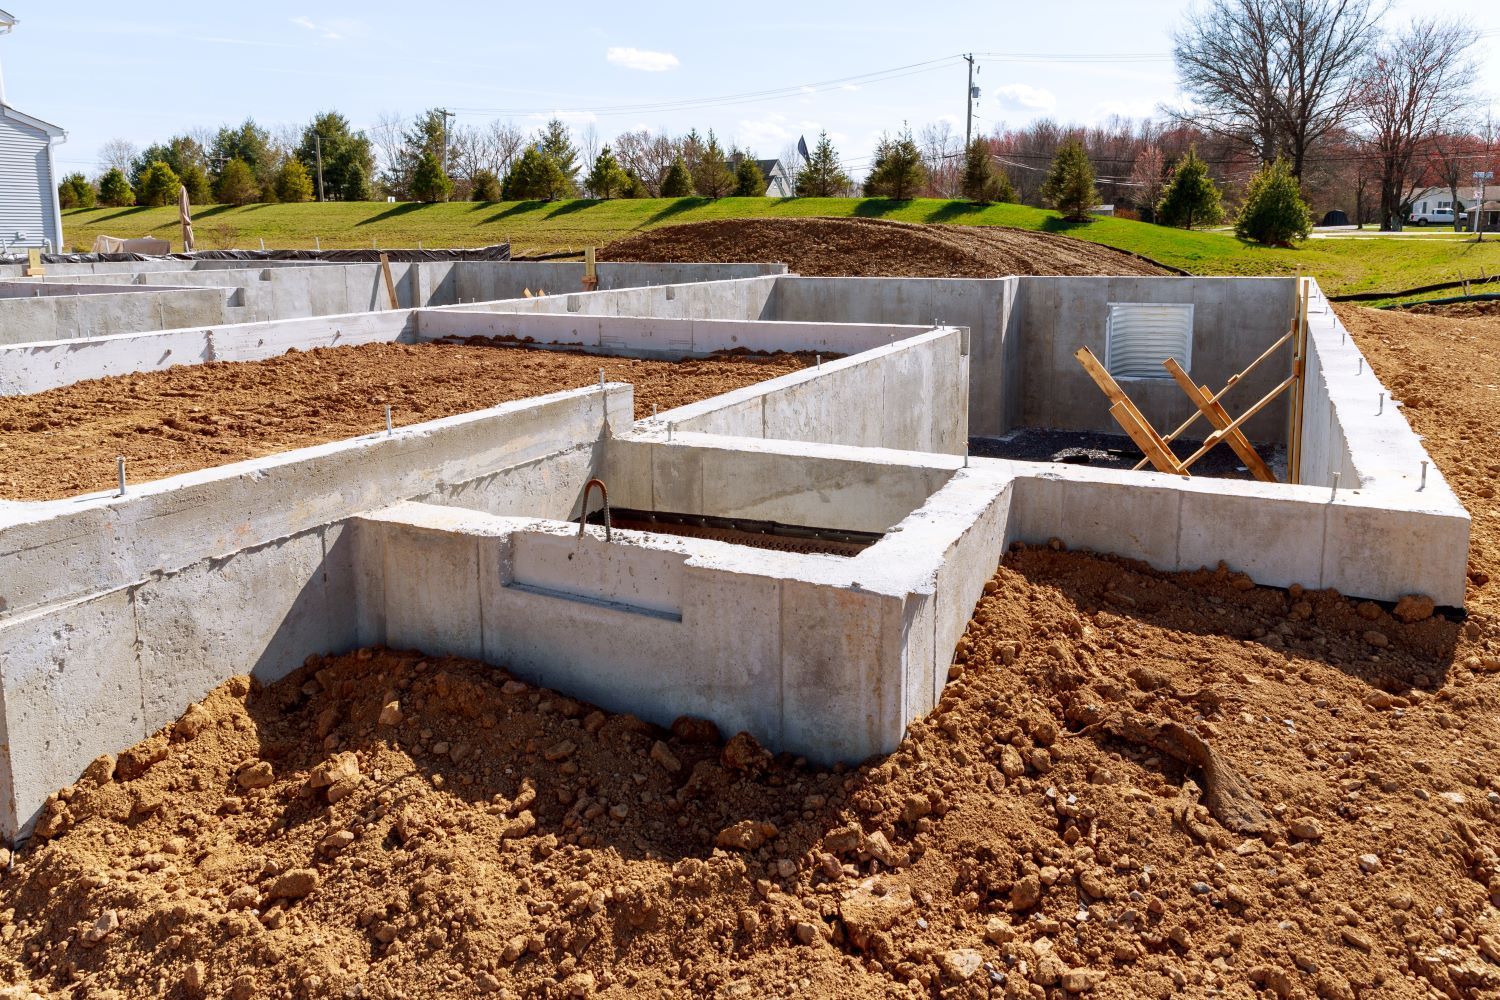
Step 2: Building the Formwork

Formwork acts like a mold that shapes the concrete until it hardens. We use wood or metal forms to outline the area and support the wet concrete during the pour. These forms are carefully leveled and braced to prevent shifting or bulging.


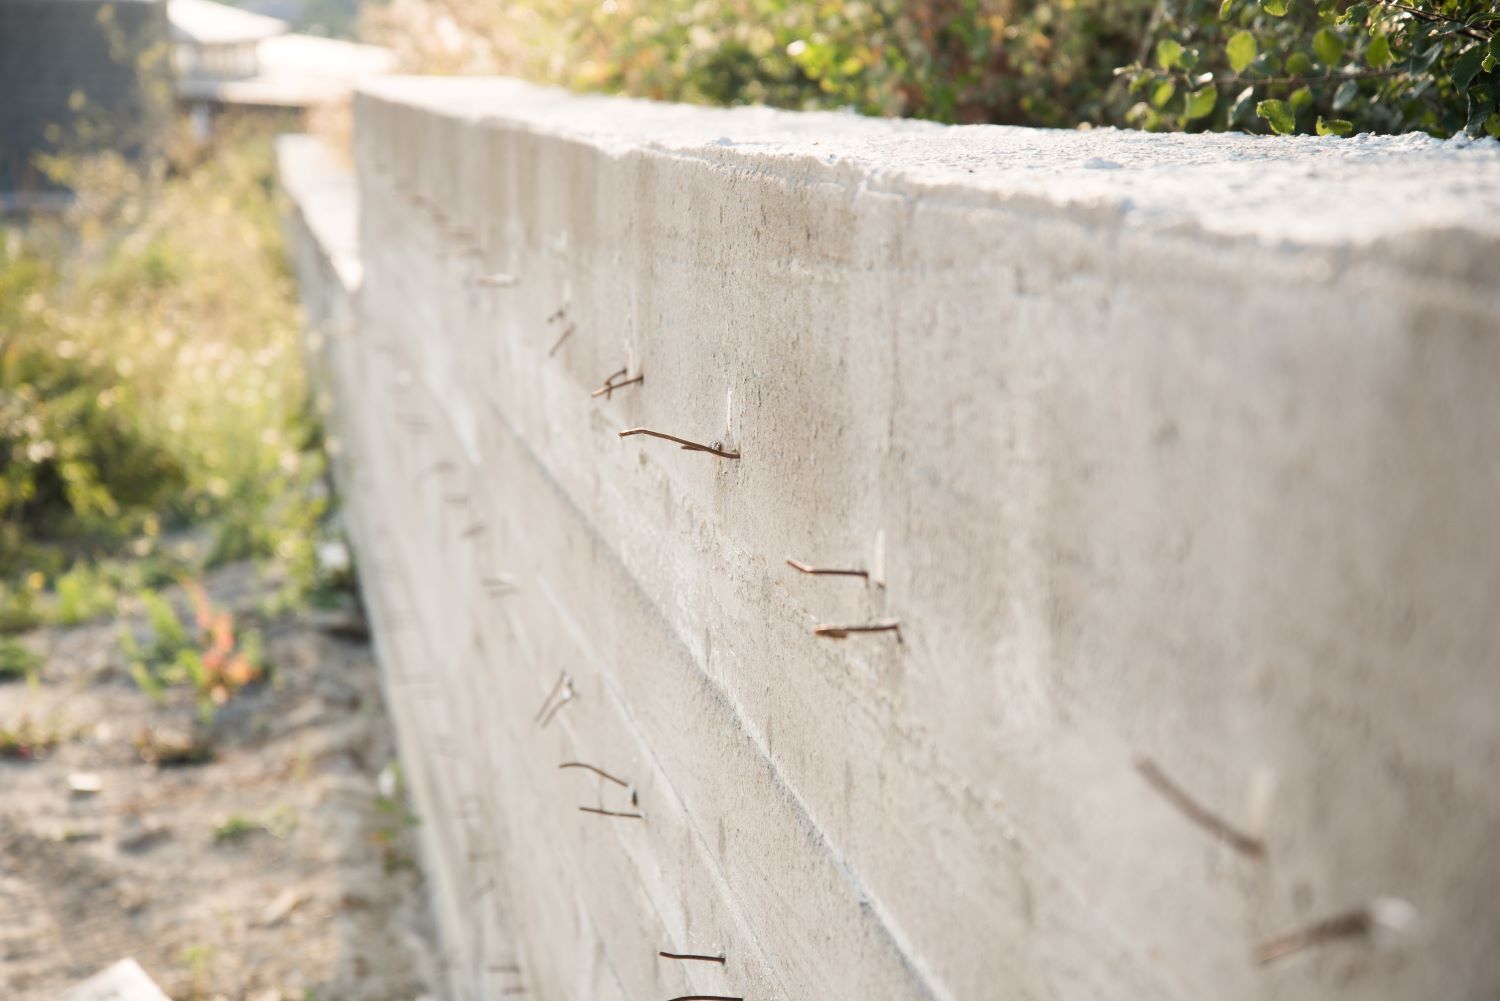
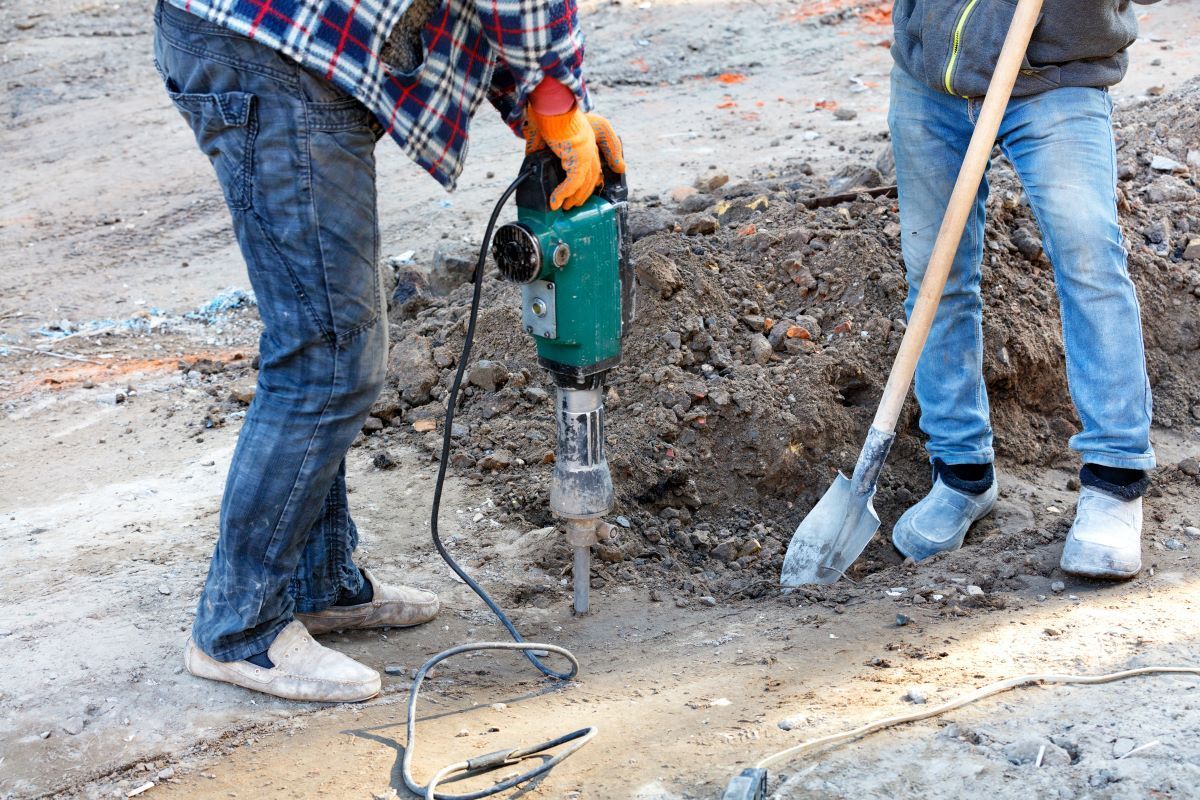
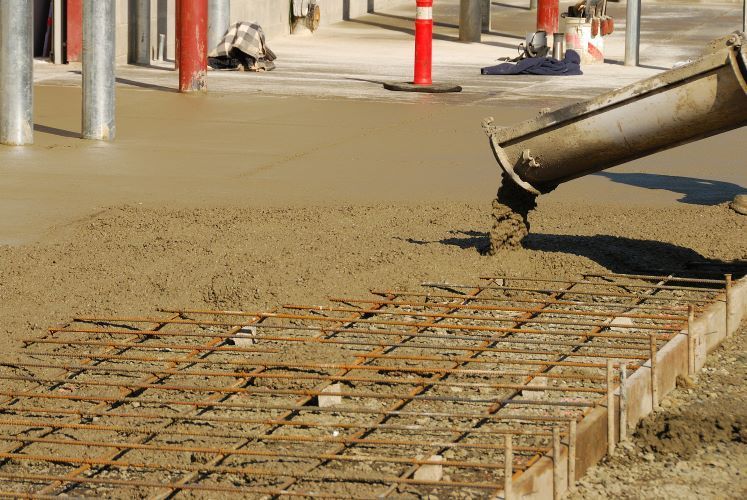
Step 3: Placing Reinforcement (if needed)

For projects that require additional strength—such as driveways or commercial slabs—steel rebar or wire mesh is added to reinforce the concrete. This helps control cracking and increases the structural integrity of the slab.


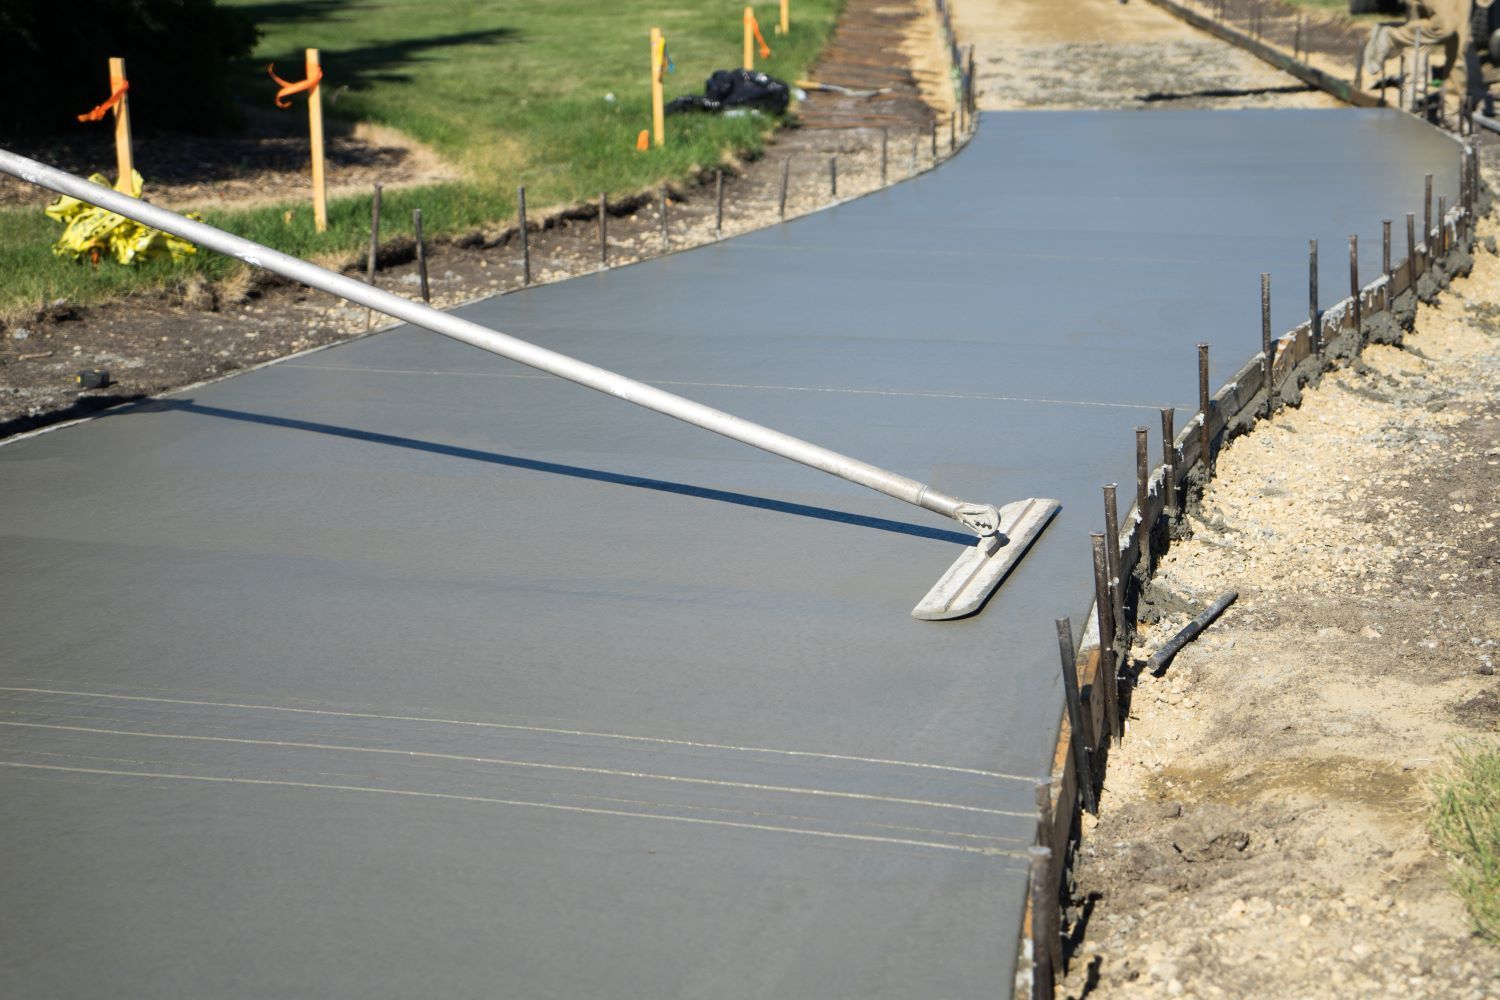
Step 4: Mixing and Pouring the Concrete

Using either ready-mix concrete from a local supplier or mixing it on-site, we pour the concrete into the forms starting from one end and working to the other. This step must be completed quickly to prevent premature setting, especially in St. John's where coastal weather can change rapidly.


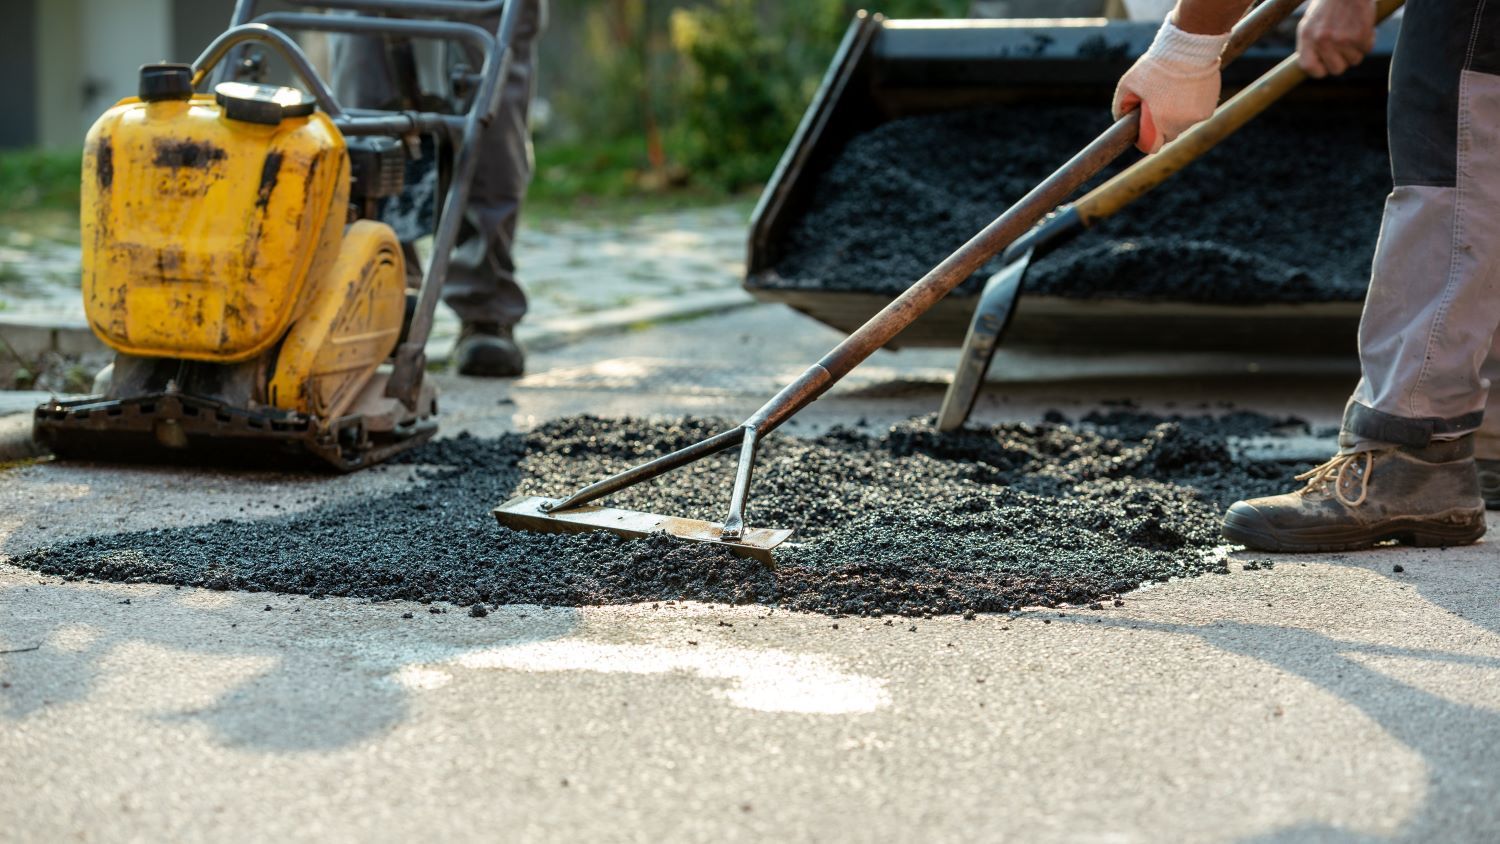
Step 5: Spreading and Screeding

Once poured, we use tools like rakes and shovels to spread the concrete evenly. Then, a screed board (a long, straight edge) is used to level the surface and remove excess concrete. This creates a smooth, even surface ready for finishing.


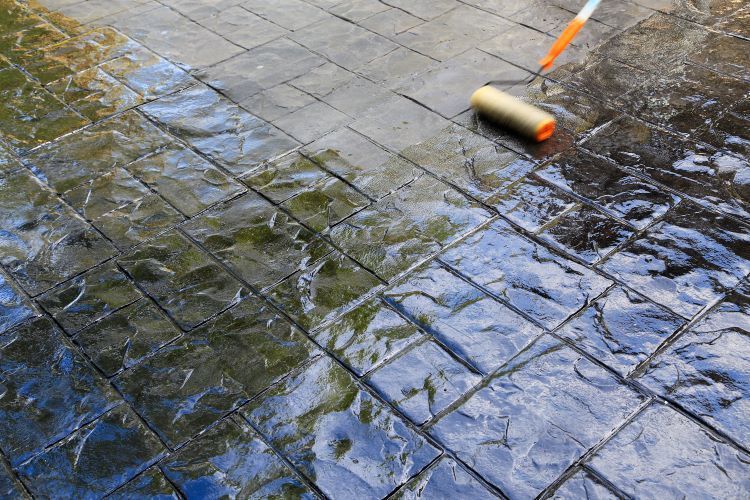
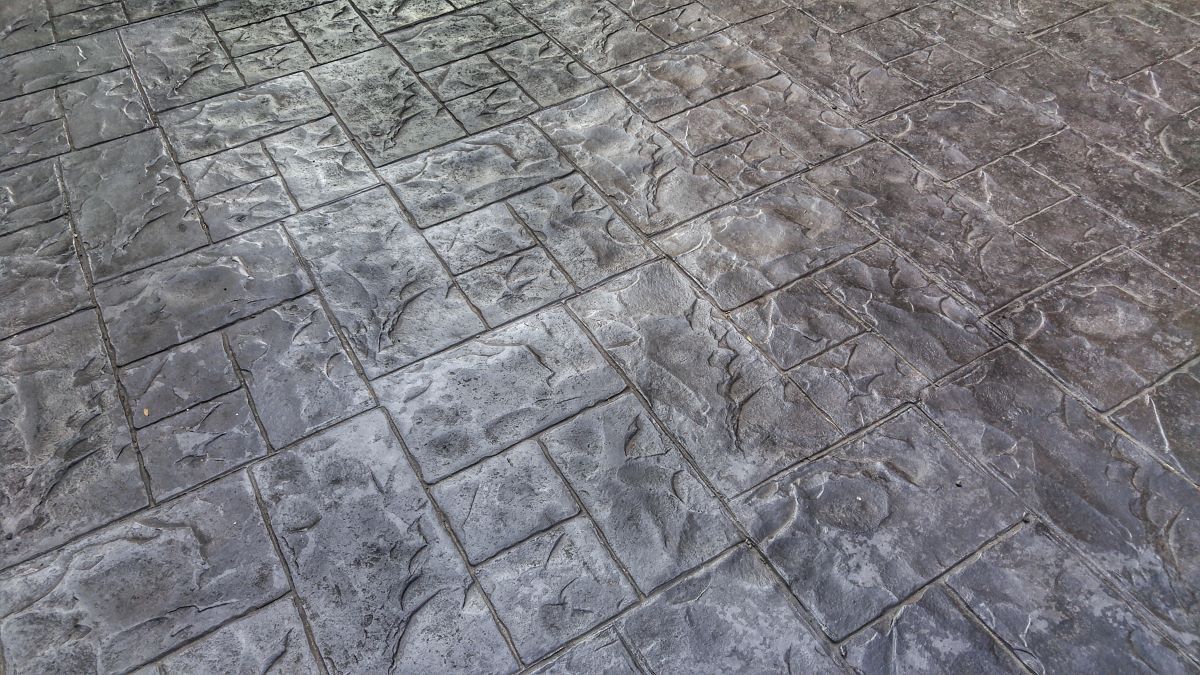
Step 6: Floating and Finishing

After screeding, we float the concrete to smooth out surface imperfections and bring up the cream (the fine material). Finishing touches may include:

  • Broom finish for traction on walkways
  • Trowel finish for a smooth, polished look
  • Stamped finish for decorative projects like patios


Step 7: Curing the Concrete

Curing is one of the most important steps and often the most overlooked. Proper curing helps the concrete gain strength and prevents cracking. We apply curing compounds or use water curing methods to keep the surface moist for at least 7 days, depending on the weather.


Step 8: Removing the Forms and Clean-Up

Once the concrete has hardened enough, we carefully remove the forms. The edges may be cleaned or finished as needed, and we clean up the site to leave your property looking neat and professional.


Why Choose Concrete Contractor St. Johns?

We bring years of experience, local knowledge, and a commitment to quality to every concrete project in St. John’s and the surrounding areas. Whether you’re building a new concrete driveway or pouring a foundation, our team ensures every step is done right.


Ready to start your concrete project?
Contact
Concrete Contractor St. Johns today for a free consultation and estimate!

June 1, 2025
Living in Newfoundland means embracing beautiful, rugged landscapes—and sometimes, challenging terrain. If your property includes a sloped yard, you may be wondering how to make it more functional and stable. That’s where concrete retaining walls come in.  At Concrete Contractor St. Johns , we specialize in helping homeowners and businesses across St. John’s manage uneven terrain with practical, attractive, and long-lasting concrete solutions. Here’s how concrete retaining walls can transform your sloped yard. Why Sloped Yards Need Retaining Walls Sloped yards might look scenic, but they often come with problems like: Soil erosion Poor drainage Limited usable outdoor space Foundation pressure A well-built concrete retaining wall addresses these issues by holding back soil, redirecting water, and creating level areas for landscaping, patios, or gardens. Why Choose Concrete? Concrete is one of the most durable materials available for retaining walls. Here's why it’s the top choice in Newfoundland's tough climate: Strength : Concrete can handle heavy soil pressure and harsh weather conditions year-round. Longevity : Properly built and sealed, concrete walls can last for decades with minimal maintenance. Design Flexibility : Concrete can be poured, formed, or precast to suit a range of styles—from rustic to modern. Low Maintenance : Unlike wood or stone, concrete won’t rot, warp, or shift over time. Design Options for Every Yard Whether you want a sleek modern look or something that blends naturally with your landscape, concrete offers many design options. Choose from: Poured-in-place concrete for a seamless, smooth finish Textured and stamped concrete for added visual appeal Segmental concrete blocks for a modular, classic look We can even match finishes to complement your home’s exterior or existing hardscaping. Professional Installation Matters Building a retaining wall isn’t just about stacking concrete. It involves: Soil analysis Proper drainage planning Reinforcement techniques Compliance with local codes Our experienced team at Concrete Contractor St. Johns handles every step, ensuring your wall is built to last—and built to code. Let’s Level Up Your Landscape Don’t let a sloped yard limit your outdoor potential. A custom concrete retaining wall can turn unusable ground into a safe, stable, and attractive space. Ready to start your project? Contact Concrete Contractor St. Johns today for a free consultation and quote. We proudly serve homeowners across St. John’s and surrounding areas with expert craftsmanship and reliable service.
May 30, 2025
When building a home in St. John’s, Newfoundland, few elements are as critical to its longevity and safety as the foundation. Your home’s foundation isn’t just the structure that supports the walls and floors — it’s the key to structural integrity, energy efficiency, and long-term value. At Concrete Contractor St. Johns , we know that a solid start makes all the difference.  Why the Foundation Matters A concrete foundation distributes the weight of the structure evenly and anchors the home against shifting soil and extreme weather — both of which are common in Newfoundland’s unique climate. With heavy rain, freezing temperatures, and coastal winds, homes in our area require dependable materials and expert craftsmanship from the ground up. The Key Benefits of a Quality Concrete Foundation 1. Structural Support A professionally poured and reinforced concrete foundation provides reliable support for the entire home. It prevents sagging floors, cracking walls, and shifting that can cause long-term damage. 2. Moisture Resistance In a damp environment like St. John’s, water intrusion is a major concern. A solid concrete foundation, properly sealed, helps keep basements dry and protects against mold and mildew. 3. Pest Prevention A strong, continuous concrete slab or wall system can deter pests and rodents from entering your home — especially compared to wood or poorly sealed materials. 4. Energy Efficiency A properly insulated foundation helps regulate indoor temperatures by reducing heat loss through the floor or basement walls. This means lower energy bills and more comfort year-round. 5. Long-Term Investment Foundations that are built to last add value to your property and reduce the likelihood of costly future repairs. Built for Newfoundland Conditions At Concrete Contractor St. Johns , we understand the unique soil and weather conditions in our region. Whether you’re building a new home or replacing an old foundation, our team uses proven techniques and durable materials suited for local conditions. From gravel base preparation to moisture barriers and rebar reinforcement, we handle every step with precision. Our goal is simple: to ensure your home stands strong for decades to come. Thinking About Building? Start with a Solid Foundation If you’re planning a build or renovation in St. John’s, don’t cut corners when it comes to your foundation. Trust the experts at Concrete Contractor St. Johns to deliver quality that lasts. 📞 Contact us today to learn more about our foundation services or to request a free estimate.
May 25, 2025
Creating a beautiful and durable concrete pathway is an excellent way to enhance the curb appeal and functionality of your St. John’s property. Whether you’re installing a new walkway to your front door, garden, or outdoor living space, careful planning is essential to ensure your pathway stands the test of time. At Concrete Contractor St. Johns , we understand the unique weather challenges in Newfoundland and the importance of quality workmanship. Here are our top tips for planning a long-lasting concrete pathway that will keep your home looking great for years to come. 1. Choose the Right Location and Design Before you pour any concrete, take time to plan the pathway’s location. Consider: Traffic flow: Design a path that matches natural walking routes. Functionality: Will it connect key areas like your driveway, porch, or garden? Aesthetics: Choose shapes and widths that complement your landscaping style. A well-thought-out design not only looks better but also reduces the risk of premature wear. 2. Prepare a Stable Base One of the most important steps in creating a durable concrete pathway is proper base preparation. A stable base prevents cracking and sinking over time. Excavate the area to a depth of about 6 to 8 inches. Compact the soil to eliminate air pockets. Add a layer of crushed gravel or stone (typically 4 inches) and compact it thoroughly. This base layer provides drainage and support for the concrete slab. 3. Select the Right Concrete Mix Not all concrete is created equal. For outdoor walkways, especially in the variable Newfoundland climate, choose a concrete mix designed for durability and resistance to freeze-thaw cycles. Ask your contractor for a mix with proper air entrainment. Consider additives that improve strength and water resistance. The right mix ensures your pathway resists cracking, scaling, and weather damage. 4. Incorporate Control Joints Concrete naturally expands and contracts with temperature changes. To avoid random cracking, your contractor will install control joints—intentional breaks in the concrete that allow movement. Control joints should be spaced about 5 to 8 feet apart. They can be tooled or saw-cut into the surface shortly after pouring. Proper joint placement helps maintain the walkway’s clean appearance and structural integrity. 5. Apply Finishing Touches The surface finish affects both the look and safety of your pathway. Common finishes include: Broom finish: Provides texture to prevent slipping. Stamped or textured finish: Adds decorative patterns and grip. Sealing: A quality sealer protects against water penetration, stains, and de-icing salts. Discuss your preferences with your contractor to get a finish that balances beauty and function. 6. Plan for Proper Drainage Water pooling on or near your concrete path can cause damage over time. Ensure your pathway is: Slightly sloped away from buildings. Integrated with drainage solutions if needed, such as French drains or channel drains. Good drainage helps preserve the pathway and prevents foundation issues. 7. Maintain Your Concrete Pathway Even the best-built pathways need care. Keep your walkway in top shape by: Cleaning regularly to remove debris and stains. Avoiding harsh chemicals or de-icers that can damage concrete. Repairing small cracks promptly to prevent further deterioration. Routine maintenance extends the lifespan of your investment. Why Choose Concrete Contractor St. Johns? With years of experience serving St. John’s and surrounding Newfoundland communities, Concrete Contractor St. Johns offers expert guidance, quality materials, and skilled craftsmanship. We tailor each project to meet the local climate challenges and your personal style, ensuring your concrete pathway looks great and lasts for decades. Ready to Build Your Perfect Concrete Pathway? Contact Concrete Contractor St. Johns today for a free consultation and let us help you design and build a long-lasting, beautiful concrete walkway tailored to your property’s needs.
May 23, 2025
When it comes to driveway materials, homeowners in Newfoundland face unique challenges due to the region’s rugged climate. From heavy snowfall and frequent freeze-thaw cycles to salty air and coastal moisture, your driveway must be built to withstand it all. That’s why more homeowners in St. John’s are choosing concrete driveways —and for good reason. At Concrete Contractor St. Johns , we specialize in creating durable, weather-resistant driveways that hold up year after year. Here’s why concrete is an ideal choice for your Newfoundland property. 1. Superior Durability Against Freeze-Thaw Cycles Newfoundland winters bring repeated freezing and thawing, which can wreak havoc on many driveway surfaces. Asphalt, for example, tends to soften in heat and crack in cold. Concrete , on the other hand, is far more resistant to temperature fluctuations. When properly poured, reinforced, and sealed, a concrete driveway can: Resist cracking from frost heave Stay level and stable in all seasons Last 25–30 years or more with minimal repairs 2. Minimal Maintenance in Harsh Weather In a province where weather can turn quickly, a low-maintenance driveway is a huge asset. Concrete requires significantly less upkeep than gravel or asphalt: No need for frequent resurfacing or regrading Easy to clear of snow and ice Less susceptible to erosion or rutting With proper sealing every few years, your concrete driveway will look great and perform well with little effort on your part. 3. Excellent Load-Bearing Strength Concrete driveways are incredibly strong and can handle heavy vehicles without sinking or developing ruts. Whether you have an RV, a trailer, or simply a full driveway during family gatherings, a properly reinforced concrete pad can handle the load . This makes it a practical choice for both residential and light commercial applications in St. John’s. 4. Better Curb Appeal All Year Long Concrete is not only functional—it’s also visually appealing. Whether you prefer a smooth, modern finish or a decorative stamped concrete look , a concrete driveway adds long-term curb appeal that boosts the value of your home. Even during long Newfoundland winters, concrete driveways stay neat and tidy, and they’re easy to clear of snow without damaging the surface. 5. Eco-Friendly and Long-Lasting Concrete is a sustainable option due to its long lifespan and recyclability. Unlike asphalt, which is petroleum-based and emits VOCs (volatile organic compounds), concrete is made from natural materials and has a smaller environmental footprint over time. Its reflective surface also helps reduce heat absorption in the summer months, which can contribute to energy efficiency around your home. 6. Customized for Newfoundland Conditions At Concrete Contractor St. Johns , we know what it takes to build a driveway that lasts in Newfoundland’s challenging environment. We: Use air-entrained concrete mixes to reduce freeze damage Ensure proper sloping and drainage to prevent water pooling Install control joints to minimize cracking Apply high-quality sealers to shield against moisture and de-icing salts Our team ensures every concrete driveway is tailored to local conditions—giving you peace of mind and long-term value. Ready to Upgrade Your Driveway? A concrete driveway is an investment in your property’s performance, appearance, and value. If you live in St. John’s or surrounding areas , trust Concrete Contractor St. Johns to deliver a driveway that’s built to last—even in Newfoundland’s toughest weather. Contact us today for a free quote or to learn more about our concrete driveway services.
May 18, 2025
If you're planning to enhance your outdoor space with a gazebo, pergola, or a cozy seating area, a level concrete pad is the perfect foundation. In a climate like St. John’s, Newfoundland , where weather conditions can be unpredictable, a stable and durable base is essential to ensure long-term performance and safety. At Concrete Contractor St. Johns , we specialize in building concrete pads that are not only functional but also long-lasting. Here’s a step-by-step guide to help you understand what goes into building a level concrete pad for your outdoor furniture or gazebo. 1. Choose the Right Location Start by selecting a flat, well-drained area of your yard that can support the weight of a concrete pad and any structure or furniture placed on top. Consider: Sun exposure (especially for gazebos or seating areas) Accessibility to your home or garden Distance from trees or root systems that could cause shifting 2. Measure and Mark the Area Use stakes and string to outline the exact dimensions of the pad. Standard patio or gazebo pads are usually between 8x8 feet to 12x12 feet , but you can customize based on your space and structure. Make sure to measure diagonally from corner to corner to ensure the layout is square. 3. Excavate and Prepare the Ground Dig down approximately 6 to 8 inches , depending on how thick your concrete pad will be. Remove all grass, roots, and loose soil. Then: Add 4 to 6 inches of compacted gravel as a base layer. Use a plate compactor to ensure the gravel is firm and level. Add a moisture barrier (landscape fabric or plastic sheeting) to prevent water from softening the ground. 4. Build the Forms Install wood forms around the perimeter using 2x4 boards or 2x6s , secured with stakes. The top edge of the form should represent the top of the finished pad . Use a level to ensure the form is even on all sides. Slight slope (about 1/8 inch per foot) is sometimes added for water runoff. 5. Reinforce with Steel Mesh or Rebar To prevent cracking and provide structural strength, insert steel mesh or rebar within the forms. This reinforcement is especially important in Newfoundland’s freeze-thaw cycles, which can stress unreinforced concrete over time. 6. Mix and Pour the Concrete Order ready-mix concrete from a local supplier or mix it yourself, depending on the pad size. Pour the concrete evenly across the form: Use a shovel and rake to spread it out. Strike off excess with a screed board , working it back and forth across the top edges of the form. Tap the sides of the form to remove air pockets. 7. Level and Finish the Surface Use a bull float to smooth the surface and push down the aggregate. Once the water sheen disappears: Use an edger to round the edges. Apply a broom finish or trowel finish , depending on the texture you prefer. 8. Allow for Proper Curing Curing is critical for concrete strength and durability. Cover the pad with plastic sheeting or curing blankets and keep it moist for 5–7 days . Avoid heavy use or placing structures on the pad for at least 7 days , with full curing typically complete after 28 days . Why Hire a Professional in St. John’s? Building a level concrete pad in Newfoundland’s climate comes with unique challenges: Frost heave risks Drainage issues in hilly or clay-heavy areas Weather fluctuations that affect curing  That’s why hiring Concrete Contractor St. Johns ensures your project is done right the first time. We handle everything from excavation to finishing and offer local expertise you can trust. Ready to Upgrade Your Outdoor Living Space? Whether you’re installing a gazebo, fire pit area, or dining setup, a level concrete pad provides a stable, attractive, and weather-resistant base. Contact Concrete Contractor St. Johns today for a free estimate and let us help you transform your outdoor area with precision and quality.
December 2, 2024
When it comes to creating a functional and beautiful outdoor space, patios often top the list for homeowners. While there are various materials to choose from, concrete patios have gained a reputation as a preferred choice over paving stones. If you're planning to enhance your outdoor living area in St. John’s, Newfoundland, here's why concrete might be the ideal option for your patio project.  1. Durability That Stands the Test of Time Concrete is renowned for its strength and longevity. Unlike paving stones, which can shift and crack over time, a properly installed concrete patio offers a seamless, stable surface that can withstand heavy use and harsh weather conditions. In St. John’s, where freeze-thaw cycles are common, concrete is less prone to movement and damage compared to individual paving stones. 2. Minimal Maintenance Requirements A concrete patio requires significantly less upkeep than a patio made of paving stones. Paving stones often need re-leveling and weeding as grass or moss can grow between the gaps. With concrete, you get a smooth surface that’s easy to clean with a hose or pressure washer. Occasional resealing can keep your patio looking pristine for years. 3. Versatility in Design Modern concrete isn’t just about utility—it’s about style. With techniques like stamping, staining, and engraving, concrete can mimic the appearance of high-end materials such as stone, brick, or wood. This means you can achieve the elegant look of paving stones without the added cost or maintenance. The wide range of finishes and colors available allows homeowners to customize their patios to suit their unique tastes and the style of their home. 4. Cost-Effectiveness Concrete patios are often more budget-friendly than paving stones, especially for larger areas. Paving stones require more materials and labor, including the time-intensive process of laying individual stones. Concrete’s streamlined installation process reduces labor costs, making it an affordable choice for homeowners seeking quality and value. 5. Enhanced Safety and Accessibility The uniform surface of a concrete patio minimizes the risk of tripping hazards, which can be an issue with uneven paving stones. For families with children, seniors, or anyone with mobility challenges, concrete offers a safer and more accessible outdoor space. 6. Resistance to Weed Growth and Pests One common frustration with paving stones is the growth of weeds and the potential for pests to inhabit the spaces between the stones. Concrete eliminates these gaps, providing a solid surface that keeps weeds and pests at bay. 7. Long-Term Value Investing in a concrete patio adds to your home’s overall value. Its durability and aesthetic appeal ensure that your outdoor space remains attractive and functional for years to come. In a market like St. John’s, where weather conditions can take a toll on outdoor features, a concrete patio can be a selling point for potential buyers. Conclusion For homeowners in St. John’s, Newfoundland, concrete patios offer a winning combination of durability, style, and cost-efficiency. While paving stones have their charm, the practical benefits of concrete make it a preferred choice for many. Whether you're looking to create a sleek, modern patio or a rustic outdoor retreat, concrete provides the flexibility to bring your vision to life. Looking to start your patio project? Contact Concrete Contractors St. Johns today to discuss how we can help transform your outdoor space with a high-quality concrete patio!
November 27, 2024
When it comes to construction and renovation projects, removing old concrete is often a necessary step. Whether you're updating a driveway, replacing a patio, or preparing a site for new construction, efficient concrete removal is crucial. Concrete cutting , a precise and efficient technique, can significantly speed up the demolition process while minimizing mess and disruption. Here’s a look at how this method can make your next project more manageable. Why Use Concrete Cutting for Demolition? Traditional concrete removal methods, like sledgehammers and jackhammers, are labor-intensive, noisy, and create a lot of dust and debris. Concrete cutting, on the other hand, offers several advantages: 1. Precision Concrete cutting tools, such as saws equipped with diamond blades, allow for clean and precise cuts. This accuracy ensures that only the targeted sections of concrete are removed, leaving surrounding areas undisturbed. 2. Time Efficiency Unlike manual methods, concrete cutting is significantly faster. Large sections can be neatly removed in a fraction of the time it would take using traditional techniques. 3. Minimized Damage Concrete cutting reduces the risk of cracking or damaging adjacent structures. This is especially important in spaces like basements or near foundation walls. 4. Clean Removal Cutting concrete creates manageable pieces that are easier to transport and dispose of, leading to a tidier worksite. Steps in Using Concrete Cutting for Demolition Here’s how concrete cutting can streamline the process of removing old concrete: Step 1: Site Assessment Evaluate the area to determine the scope of the demolition. Identify utility lines, assess the thickness of the concrete, and plan the cutting pattern. Step 2: Mark the Cutting Lines Clearly mark the areas where cuts will be made. This ensures accuracy and helps workers stay on track during the cutting process. Step 3: Select the Right Equipment Depending on the size and location of the concrete, professionals may use wall saws, slab saws, or handheld saws. For thicker or reinforced concrete, diamond blades are the best choice. Step 4: Cut the Concrete Using specialized saws, the concrete is cut into smaller sections. These sections are easier to handle, making the removal process faster and safer. Step 5: Remove the Cut Sections The cut pieces are lifted and transported for recycling or disposal. Recycling concrete, when possible, is an eco-friendly option. Applications of Concrete Cutting in Demolition Concrete cutting can be used in various demolition scenarios, including: Driveways and Sidewalks : Removing sections of damaged or uneven concrete. Basements : Preparing floors or walls for plumbing or electrical installations. Patios and Pool Decks : Upgrading outdoor spaces by replacing old, cracked surfaces. Building Foundations : Demolishing unwanted concrete while protecting the surrounding structure. Hiring Professionals for Concrete Cutting While concrete cutting might seem straightforward, it requires expertise and specialized equipment. Hiring professionals, like Concrete Contractors St. Johns , ensures the job is done safely and efficiently. Our team uses advanced tools and techniques to deliver precise results while adhering to safety standards. Conclusion Removing old concrete doesn't have to be a messy, time-consuming task. With the help of concrete cutting, you can speed up demolition while minimizing damage and cleanup. Whether you're planning a large-scale commercial project or a home renovation, this method is an excellent choice for efficient and precise concrete removal. If you’re in St. John’s, Newfoundland, and need expert assistance with concrete cutting or removal, Concrete Contractors St. Johns is here to help. Contact us today to discuss your project and get a free estimate!
November 18, 2024
When it comes to choosing a driveway material, the decision often boils down to two popular options: concrete and asphalt. Both materials have distinct advantages and drawbacks, making it essential to evaluate your needs, budget, and local climate before making a choice. At Concrete Contractors St. Johns , we aim to help homeowners in St. John's, Newfoundland, make informed decisions for their properties. This article outlines the key pros and cons of concrete and asphalt driveways to help you decide which option is best for you. Concrete Driveways Pros: Durability Concrete driveways are incredibly durable and can last 30–40 years with proper maintenance. They hold up well against heavy vehicles and resist wear and tear better than asphalt. Low Maintenance Once installed, concrete driveways require minimal upkeep. Occasional cleaning and resealing every few years are typically sufficient to maintain their appearance and structural integrity. Aesthetic Appeal Concrete offers versatile design options, including stamped patterns, colored finishes, and textured surfaces. These features can enhance the curb appeal of your home. Resistance to Weather Concrete is less susceptible to deformation during hot summer months, making it a good choice for areas with fluctuating temperatures. Cons: Higher Upfront Costs Concrete driveways tend to have a higher initial cost compared to asphalt, making them a more expensive option for homeowners on a budget. Susceptible to Cracking While concrete is durable, it can develop cracks over time, especially in areas with freeze-thaw cycles like St. John's. Proper installation and sealing can mitigate this issue. Longer Installation Time Concrete driveways require more time to install and cure compared to asphalt, which could be a drawback if you're on a tight schedule. Asphalt Driveways Pros: Lower Initial Cost Asphalt is generally less expensive to install than concrete, making it a budget-friendly choice for many homeowners. Quick Installation Asphalt driveways can be installed and ready to use in a shorter time frame, often within a few days. Easier Repairs Small cracks and potholes in asphalt driveways can be patched relatively easily and inexpensively, which extends their lifespan. Cold Weather Performance Asphalt is more flexible than concrete, which makes it less likely to crack during freeze-thaw cycles—a significant consideration in St. John's climate. Cons: Shorter Lifespan Asphalt driveways typically last around 15–20 years, significantly less than concrete. Regular maintenance is required to maximize their longevity. Higher Maintenance Requirements To keep an asphalt driveway in good condition, it needs to be sealed every 2–3 years. Neglecting this maintenance can lead to faster deterioration. Heat Sensitivity Asphalt can soften and become sticky during hot summers, which might cause deformation and reduced durability over time. Limited Design Options While asphalt driveways provide a sleek black finish, they lack the decorative customization options available with concrete. Concrete vs. Asphalt: Which Is Right for You? Key Considerations: Budget If you're looking for a more affordable upfront cost, asphalt may be the better option. However, if you want a long-lasting investment, concrete might save you money in the long run. Aesthetic Preferences For those who prioritize curb appeal and want unique design features, concrete is the clear winner. Climate While both materials are suitable for St. John's weather, asphalt's flexibility makes it better equipped to handle the region's freeze-thaw cycles. Maintenance Commitment If you prefer a low-maintenance driveway, concrete requires less frequent attention compared to asphalt. Our Recommendation For homeowners in St. John's, Newfoundland, the choice between concrete and asphalt often depends on individual needs and priorities. Concrete is ideal for those who value durability, aesthetics, and minimal maintenance, while asphalt is a practical option for those seeking affordability and ease of installation. At Concrete Contractors St. Johns , we specialize in creating high-quality concrete driveways that are built to last. Our team can guide you through the process, ensuring a smooth installation that meets your needs. If you're leaning toward asphalt, we can also connect you with trusted local experts to help with your project. Final Thoughts Your driveway is one of the first things people notice about your home, so choosing the right material is crucial. Whether you opt for concrete or asphalt, investing in a well-installed and maintained driveway will enhance your property's value and functionality.  Contact Concrete Contractors St. Johns today to learn more about our driveway solutions. Let us help you create a driveway that’s durable, stylish, and perfectly suited to your home!
November 11, 2024
Keeping your commercial property's concrete surfaces in excellent condition is crucial for maintaining a professional appearance, ensuring safety, and prolonging the lifespan of your investment. Whether it's sidewalks, parking lots, or entryways, properly maintained concrete can enhance curb appeal and prevent costly repairs down the line. At Concrete Contractors St. Johns , we understand the unique challenges that property managers in St. John's, Newfoundland, face due to our harsh winters and coastal climate. In this article, we'll walk you through a comprehensive concrete maintenance checklist to keep your commercial property looking its best. 1. Regular Visual Inspections The first step in maintaining your concrete surfaces is conducting regular visual inspections. At least once a month, walk around your property and look for signs of damage such as: Cracks or fissures Potholes Surface discoloration or staining Uneven or sunken areas Exposed rebar or aggregate Spotting these issues early on allows for timely repairs, which can prevent minor problems from turning into major ones. 2. Clean Surfaces Frequently Dirt, grime, oil spills, and other debris can accumulate on concrete surfaces, leading to deterioration over time. Regular cleaning helps to prevent staining and extends the life of your concrete. Here’s how to maintain a clean surface: Sweep: Regularly sweep the area to remove dirt and debris. Pressure Wash: Use a pressure washer to remove stubborn stains and buildup. This is especially important for high-traffic areas like parking lots and walkways. Detergent Cleaning: For oil stains or chemical spills, use a commercial concrete cleaner or degreaser. Make sure to rinse thoroughly to avoid any residue. 3. Seal and Reseal Concrete Surfaces Concrete sealers provide a protective barrier that helps prevent moisture penetration, chemical damage, and surface wear. For commercial properties in St. John's, where freeze-thaw cycles can wreak havoc on concrete, sealing is especially important. Choose the Right Sealer: Use a high-quality penetrating sealer that is designed for your specific concrete type and exposure level. Resealing Schedule: Most commercial properties benefit from resealing every 2-3 years, but high-traffic areas may require more frequent applications. 4. Repair Cracks and Potholes Promptly Even small cracks can lead to significant damage if left unattended. Water can seep into cracks, freeze, and expand, leading to larger cracks and potholes. To avoid this, make it a priority to repair any visible damage as soon as possible. Crack Filler: Use a commercial-grade concrete crack filler for minor cracks. Patching Compound: For larger holes, use a concrete patching compound to restore the surface. Professional Repair: For extensive damage, consider hiring a professional concrete contractor to assess and repair the issue. 5. Apply Anti-Slip Coatings Safety is a top concern for any commercial property. Applying anti-slip coatings can prevent accidents, especially in wet or icy conditions. This is crucial for entryways, ramps, and other areas prone to foot traffic. Choose Anti-Slip Products: Look for coatings that provide texture to increase traction. Routine Reapplication: Depending on the product used, you may need to reapply the coating every 1-2 years. 6. Protect Against Freeze-Thaw Damage St. John's experiences frequent freeze-thaw cycles during the winter, which can cause concrete to crack and deteriorate. To protect your concrete from these harsh conditions: Use De-Icing Products Sparingly: Rock salt can cause concrete to deteriorate. Opt for more concrete-friendly alternatives like magnesium chloride. Snow Removal: Promptly remove snow and ice from concrete surfaces to reduce freeze-thaw damage. Insulation: For exposed areas, consider using insulated concrete blankets during severe cold spells. 7. Check Drainage Systems Poor drainage can lead to water pooling on concrete surfaces, which accelerates wear and tear. Ensure your property’s drainage system is working efficiently to protect your concrete. Inspect Drains and Gutters: Clean out debris that can block drainage systems. Grade the Surface: Ensure concrete surfaces are graded to direct water away from the property. Fix Low Spots: If you notice water pooling in certain areas, consider leveling or installing additional drainage solutions. 8. Protect Edges and Corners Edges and corners of concrete surfaces are particularly vulnerable to damage, especially in high-traffic areas. Consider reinforcing these areas with: Edge Protectors: Install rubber or metal edge guards to protect against chipping and cracking. Bollards and Barriers: Use barriers in parking lots to prevent vehicle damage to concrete curbs and corners. 9. Schedule Annual Professional Inspections While regular maintenance can prevent many issues, having a professional inspection annually is essential. A qualified concrete contractor can identify potential problems that may not be visible during a routine inspection and provide solutions that save you money in the long run. Comprehensive Assessment: Professionals will check for structural integrity, surface wear, and potential issues. Preventative Maintenance: They can recommend preventative measures, like applying a new sealant or repairing minor cracks before they worsen. 10. Plan for Regular Upkeep Concrete maintenance is not a one-time task but a continuous process. Create a maintenance schedule that includes inspections, cleaning, sealing, and repairs throughout the year. Having a set schedule ensures that your concrete surfaces remain in top condition, reducing long-term repair costs. Conclusion Concrete maintenance for commercial properties in St. John's is vital for safety, aesthetics, and longevity. By following this comprehensive checklist, you can ensure that your concrete surfaces remain durable and appealing year after year. Regular inspections, timely repairs, and preventative measures are the keys to extending the life of your concrete investments. At Concrete Contractors St. Johns , we offer expert services to help you maintain your commercial concrete surfaces. Contact us today to schedule a consultation and let us help you keep your property looking its best.
November 4, 2024
If you’re noticing that your concrete surfaces look dull or discolored, or that they no longer repel moisture as effectively, it might be time to reapply a concrete sealer . However, before you put down a fresh coat, it’s crucial to properly remove the old, worn-out sealer. Reapplying sealer over the old layer can trap dirt, cause uneven application, and reduce the new sealer’s effectiveness.  Here’s a step-by-step guide to help you effectively remove old sealer from your concrete surfaces before reapplying, ensuring a smooth, long-lasting finish. Why Removing Old Sealer is Important Old sealers can break down over time due to exposure to the elements, heavy foot traffic, or vehicle use. When the sealer starts to wear, it not only affects the appearance of the concrete but also reduces its protective capabilities. Removing the old sealer helps: Ensure Proper Adhesion: New sealer adheres better to clean, unsealed concrete, enhancing its protective power. Prevent Surface Damage: Built-up layers of sealer can crack and peel, damaging the concrete underneath. Improve Aesthetic Appeal: Removing old sealer ensures an even, attractive finish that enhances the concrete’s natural look. Step-by-Step Guide to Removing Old Concrete Sealer Step 1: Determine the Type of Sealer There are two main types of sealers commonly used on concrete surfaces: Film-forming sealers (acrylic, epoxy, polyurethane): These create a protective layer on top of the concrete and can often be identified by their glossy or matte finish. Penetrating sealers (silane, siloxane): These sealers penetrate below the surface to provide a barrier against moisture and staining. Knowing the type of sealer you’re dealing with is crucial, as different removal methods apply. Step 2: Choose the Right Removal Method Depending on the type of sealer, there are several ways to remove it: Chemical Strippers: These are specially formulated solutions designed to break down old sealer. They work best for removing film-forming sealers but can also be used on some types of penetrating sealers. Power Washing: For lighter sealers, a high-powered washer (around 3000 PSI) can effectively strip off the sealer without chemicals. Grinding or Sandblasting: These mechanical methods can be used when chemical stripping and power washing aren’t sufficient. Grinding and sandblasting are more aggressive and can be used on thick sealer build-up. Step 3: Prepare the Surface and Apply Stripper (if using) If using a chemical stripper: Choose the Right Stripper: Look for a solvent-based stripper that’s compatible with the type of sealer on your concrete. Apply the Stripper Evenly: Use a sprayer or brush to apply the stripper generously over the concrete surface, following the product instructions. Allow it to sit for the recommended time, typically between 15 minutes and an hour, depending on the thickness of the old sealer. Scrub the Surface: After the sealer has softened, use a stiff-bristled broom or scrub brush to help lift the sealer from the concrete. Step 4: Power Wash and Rinse Once you’ve scrubbed the sealer, it’s time to remove it: Power Wash the Concrete: Use a high-powered pressure washer to blast away the sealer and stripper residue. This step helps ensure that all the sealer is thoroughly removed. Repeat if Necessary: Some sealers are more stubborn than others. If you notice spots where the sealer remains, repeat the process as needed to ensure a clean surface. Step 5: Let the Concrete Dry Completely After you’ve finished removing the old sealer, allow the concrete to dry thoroughly. This could take up to 48 hours, depending on the humidity and temperature. Proper drying ensures that the new sealer adheres well and provides even coverage. Step 6: Apply the New Sealer With a clean, dry surface, you’re ready to apply the new sealer: Choose the Right Sealer: Consider the environment and type of concrete. For instance, if your concrete is exposed to heavy moisture (as is common in St. John’s climate), a penetrating sealer can provide better moisture resistance. Apply Evenly: Use a sprayer, roller, or brush to apply the sealer evenly. Start with a thin layer and add additional coats as recommended by the manufacturer, allowing adequate drying time between coats. Tips for a Successful Concrete Sealing Job Follow Manufacturer Instructions: Every sealer has unique application and drying instructions. Adhering to these will help achieve a durable, high-quality finish. Avoid Humid Days for Application: Moisture can interfere with the sealer’s ability to bond to the concrete, so try to apply the sealer on a dry, sunny day. Consider Professional Help for Large Areas: For expansive concrete surfaces, hiring a professional can save time and ensure even application. Conclusion Removing old sealer from concrete before reapplying is an essential part of maintaining your concrete’s durability and appearance. By following the steps above, you’ll prepare your concrete surface effectively, allowing the new sealer to perform its best. Concrete Contractors St. Johns is here to assist with all your concrete needs, from stripping old sealers to applying new ones, ensuring your surfaces are protected and looking great year-round.
More Posts